레이블이 GoogleAppsEnglish인 게시물을 표시합니다. 모든 게시물 표시

2013년 12월 18일 수요일

How to make Email form created using Google Drive

Form mail, surveys, documents, database, it is possible to create using Google Drive.

All of this is free.

Assumes that you have Google ID. And I will write about how to create form mail.
Google Drive's address is as follows .

https://drive.google.com/

When you log in, the following screen will be displayed.


Please select in the order as shown below.


As a result, the following screen will appear.


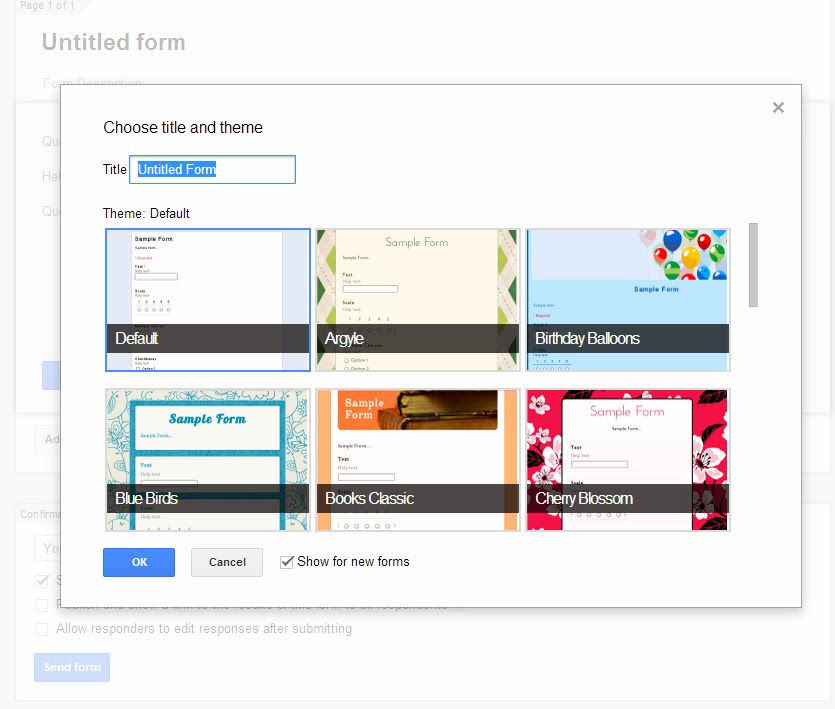
Please select a theme of your choice and you write an appropriate title.

Now, you will see the screen like the following in the next step.


  1. This part is that received the user for input. (such as name, e-mail address.)
  2. This part is provide an explanation to the user what is meaning about no.1.
  3. This is the part you choose what kind of question.
  4. if questions will must be answered by all means, you will check the Check box.
  5. Select If you have a question that you want to add. (Various types exists.)
  6. It is a button like a preview.
  7. If you completed all settings, push this button.

              If no.3, I would note only the following.


              "Text" is used when receives a short text like a telephone number, name, email.
              "Paragraph Text" is used when receives a long sentence like email content.

               I tried to make as follows.


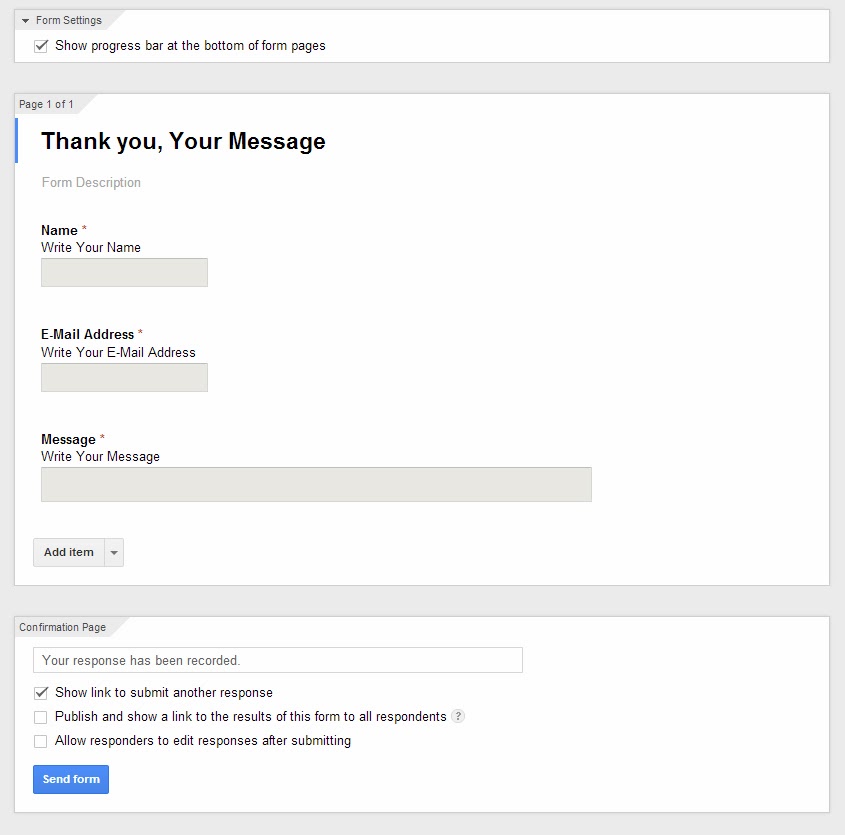
                        First thing, I set 'Name'. Next Selection is 'Add Item' in 'Text'. It will use by 'E-Mail Address'.
                        And one more 'Add Item' selection and set 'Paragraph Text'  . That will use by 'Message' like email contents.

                        When complete, push the button no.7. Now, you can see following screen.


                            1. You can copy the address. And you tell to user. So user can use it through the messenger and email.
                            2. You can also put the code to come out by pressing here on the home page.


                              To record the result to respond, selects like following figure.


                                As a result, the following window appears, click OK.


                                A result of the response as shown in the figure below, will be saved as a new file.


                                You can create a form various as necessary, and can take advantage.


                                2013년 12월 17일 화요일

                                Added SyntaxHighlighter with blogger

                                Code is entered when you write a sentence for programming. If you want to create a code on the web, it is difficult to read row is not match.

                                In such a case, even on the web, there is a script for the code to come out well clean. Is SyntaxHighlighter.

                                If you install this script, the code will come out clearly.

                                I will explain how to install the blogger this script.


                                First, go into the setting, please click the Edit in HTML.
                                It got to search for "<head>" by pressing the "Ctrl + F".


                                I put the following code below it. (I. Was me put a C #)


                                If you want to exchange the theme, please change in what you like the link below


                                http://alexgorbatchev.com/SyntaxHighlighter/manual/themes/

                                It is a matter of adding another, but it may not be set by those who do not need.
                                It is part of the scroll bar is generated code is long. This is a little inconvenient to me.
                                So, to eliminate the scroll bar, text is long, so let's put the code that brings a wrap.
                                Press "Ctrl + F" again, </ b]]> ': if you search for skin> ", places like the figure below comes out.


                                Here is the part that css setting.
                                On top of this, is if you can put the following code.
                                /*--------Delete the vertical scroll in SyntaxHighlighter-----*/
                                .syntaxhighlighter {
                                 overflow-y: hidden!important; overflow-x: auto!important; 
                                }
                                 
                                /*--------Word wrap in SyntaxHighlighter-----*/
                                .syntaxhighlighter .line {
                                        white-space: pre-wrap !important; /* make code wrap */
                                

                                I installed such that it has done all this way.
                                If you want to add the type of other code, I can look at the following links.


                                http://alexgorbatchev.com/SyntaxHighlighter/manual/brushes/css.html

                                The method used to create the text, is if it is possible to observe the rules as follows: when the insert code.
                                
                                
                                When there is a code like the following, and I'll wrap up the code in <Pre.....> </ Pre> as described above

                                // When the button is pressed
                                if (Input.GetMouseButtonUp(0) == true)
                                {
                                    // If there is a particle
                                    if (testParticle)
                                    {
                                        // If the particle is playing, you can erase You need to stop the playback
                                        if (testParticle.isPlaying == true)
                                        {
                                            testParticle.Stop();
                                            testParticle.Clear();   

                                            //Debug.Log("STOP");
                                        }
                                        // If it is not playing, playing
                                        else
                                        {
                                            testParticle.Play();

                                            //Debug.Log("PLAY");
                                        }
                                    }
                                }

                                It's made ​​to come out as follows.
                                // When the button is pressed
                                if (Input.GetMouseButtonUp(0) == true)
                                {
                                    // If there is a particle
                                    if (testParticle)
                                    {
                                        // If the particle is playing, you can erase You need to stop the playback
                                        if (testParticle.isPlaying == true)
                                        {
                                            testParticle.Stop();
                                            testParticle.Clear();   
                                
                                            //Debug.Log("STOP");
                                        }
                                        // If it is not playing, playing
                                        else
                                        {
                                            testParticle.Play();
                                
                                            //Debug.Log("PLAY");
                                        }
                                    }
                                }